 Mosaizer XV / Video -
Help Mosaizer XV / Video -
Help |
Mosaizer XV / Video -
Help
User interface
Menu Here you find the controls for managing input and output ('File',
'Library', 'Projects'), show or hide
parts of the interface ('View'), and convenient shortcuts to open the
Windows Explorer of a certain folder (e.g. 'My Pictures' folder), and
finally the tools ('Settings', 'Registering', 'Help', etc). Information This is the picture that is used to recreate from a library of (smaller) pictures. Some basic
information is also shown here: tile size; the amount of library coverage when the current size is applied; and
how many tiles are required compared to the available amount in the library. One word on the coverage: this is
a figure that indicates how many tiles have been applied in the last mosaic rendering relative to the full
library size. For example: 67% means that the last mosaic rendering has used 67% of all the pictures in the
library at least once. Function buttons Each function button will show its corresponding controls in a pop-up window. In
this pop-up window you can set the parameters that apply to the selected function. Only one pop-up window can
be open. So, when clicking another button the content of the open pop-up windows is replaced with the selected
function. These are the workspace tabs that are required to show the result, pre-process, post-process etc, and
some additional functions that require an user interaction, like creating and drawing a so-called 'density mask' . At the bottom of each of these tabs the applicable controls are
visible. Each tab has dedicated controls that are relevant for the tab. The user can move the picture in each viewer window by dragging the picture by the mouse (press left
button while moving the mouse in the desired direction). This only works if a magnification is used. Dedicated tab controls Each functional tab can have a couple of controls. Some control are common (zoom), other are specific
and are shown or hidden, depending which tab is open. The control values of a tab will not change with
selecting a different tab. Start button The start button is of course the button you need to press to create a new mosaic. When the
application found no obvious errors, the button will show a small 'OK' icon. In case a super-sized
mosaic will be made, the icon changes to an exclamation mark. When a serious (potentially error) issue is
expected the 'NOK' icon will appear, and in most cases the button is then disabled until the issue is
solved. Taskbar Here useful information is found for the application. From left to right: RAM
usage, working status, cursor location and selected portion size, library name, project name, mosaic result
size (bitmap size in RAM) and the time/date. General settings The General settings apply for all the functions. Similar
to Mosaic Video (see dedicated chapter on this application), the following settings are
available: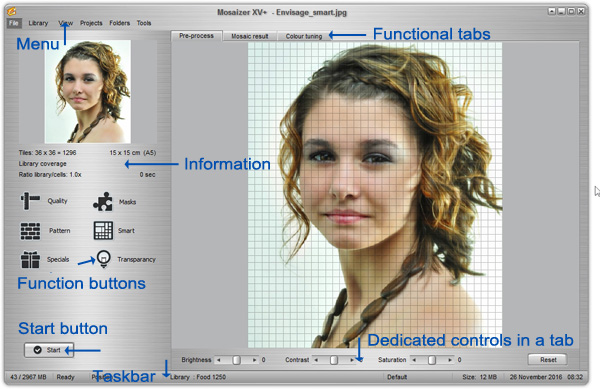
Functional tabs
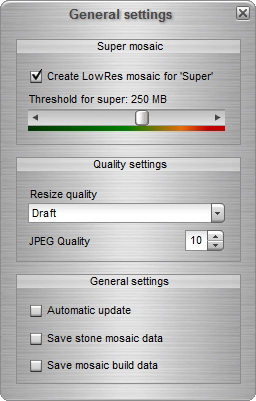
Create LowRes mosaic for
'Super': the super mosaic is automatically initiated when the maximum output size is
met. The default is set to 250 MB, a quite safe limit. By default, the super-size mosaic
will skip the creation of a lower resolution version (much lower: cell size appr. 16 pixels). To activate
this option you need to check this box.
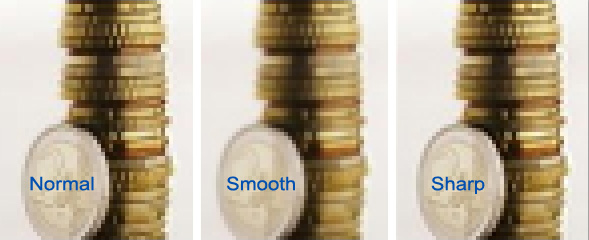
Resize quality : here
you can set your personal choice of how bitmaps needs to be resized. The quality can vary largely,
depending on the selection. The choices are: Draft, Normal, Smooth, Sharp. The draft settings is slightly
faster than the normal. The smooth is the slowest. The picture below shows the differences for three
options, enlarged to 400% of the original size to see the effect in detail.
Automatic update: each time the application starts it will
check if a new version is available (and will notify if this is the case).
Save stone mosaic data: three files will be generated and
saved in the default save location (initial default: 'My pictures').
When the user changes the save location (e.g. by saving a mosaic picture), this default save stone data
location is changed as well. The files are: 'Mosaic_Layout.jpg', 'TileDetails.csv' and
TileDetails.jpg.
Save mosaic build data: one additional file
is created:'Tile_Locations.csv'. This file contains all the locations of each picture. It's basically an excel spreadsheet
indicating where a picture can be found in its horizontal and vertical position in the mosaic.
It refers the picture name in the library (so: not the full path, just the file name
in the picture library).
Metric or ANSI: indicate
whether you'd like the GUI data in metric system (cm) or ANSI
(inches).
Print density (DPI, dots per inch): this value is used to calculate the actual
size of a tile and full mosaic, when printed in this density. It's a bit of an
artificial value, since most printers can easily print at 1200 dpi. The value
is defaulted to 300, meaning: when one pixels is printed as one drop of ink on
a 300 dpi printer, the actual mosaic size will be the value indicated in the
GUI. In reality you can safely enlarge the mosaic to a factor 4 or
beyond, where pixels do not correspond any more with actual ink droplets. To
help you calculate the tile size and mosaic size, the dpi value is largely
useful to set, and make sure your intended print size (real world print size)
is achieved, where you can now also see how large and actuial tile will be
when printeds in that size. An example: suppose you want to create a
mosaic of 100 x 83 cm (A0 size), then you can set the dpi to a value
of 96 (the line density of many household monitor screens), and start
composing your mosaic. We have selected two possible sizes: 32 tiles of 98
pixels or 26 tiles of 121 pixels. In the latter case the real world tile
size will be 3.24 x 3.24 cm. When you now create this mosaic and show the
result 100% on your screen you will get a pretty realistic impression of the
real world print size. But foremost: you cannot accurately predict the
tile size when you print at an unknown density or in automatic print
settings, e.g. from
Windows. You really need to perform proof printing to accurately set the final size for
mosaic, and therefore real printed tile size.

Picture above: 32 x 18 tiles, 98
pixels square = 2.62 x 2.62 xm per tile on 95 dpi monitor
screen.
Picture below: 26 x 31 tiles, 121 pixels square = 3.24 x 3.24 cm
per tile on monitor screen.